Congratulations, everyone! We've reached 700 Pageviews! Well, actually, 720, but WELL DONE AND THANK-YOU!!!!! Our next goal, 1000!
Bye! And well done!
-Just Grace
Friday, 1 February 2013

Sunday, 27 January 2013
Word of the Week: Hobbledehoy
Hobbledehoys: Pronounciation: Hob-ble-de-hoys
Meaning:Noun.
Meaning:Noun.
A gawky adolescent boy.
Haha! Funny! If you have any idea's for a Word of the Week, then please comment it bellow! :D
-Just Grace
Haha! Funny! If you have any idea's for a Word of the Week, then please comment it bellow! :D
-Just Grace
Nearly 700 PAGEVIEWS!!!!!!
WOW!!!! We've all nearly reached 700 Pageviews!!! We're right now on 695!!! Thanks, everyone, and I'll be sure to say when we reach 700!!! :D
-Just Grace
-Just Grace
Tuesday, 15 January 2013
Make your own Sun-Glasses!
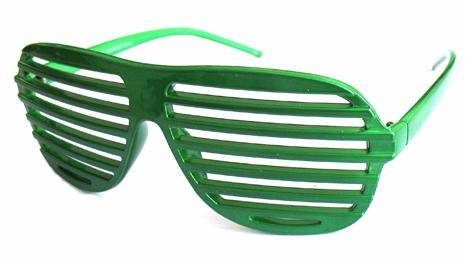 The way to make these, (which is my way), is very simple with only needing a few household items. We're not making the Sun-Glasses to keep out the sun, we're making the ones that looks like the one in the picture.
Ok, this is what you'll need:
2x Pieces of A-3 sized paper
4x Skewers
Coloured Pencils
Textas
Stapler
Lead Pencil and
Sticky Tape
(I also needed something to copy off, like an image off my Laptop)
Here's what you need to do to make this, and it took me about 1 hour, but I wasn't following instructions, it was all still in my mind.
1. Pick something round to draw. Like someone’s head or the head of like a lion or something. You can also do stuff like Flags, but some of it will be cut off.
2.Fold one of your pieces of paper into thirds/fourths, then fold that in half. Cut at that fold only, so you'll have two piles of paper. Next, you staple in the top right corner, and then in the bottom left corner on both piles so all of the paper is stuck together.
3. Draw on the top of both piles of paper what you've chosen to draw, then cut them out and staple again in three spots.
4. Trace both of the drawings onto the other piece of paper, then enlarge the drawing by 1 centimetre. Cut the enlarged one out, but don't forget to colour the enlarged one in the main colour of your drawing. Retrace the drawing into the enlarged one.
5. Draw some lines on the back of each pile of paper, then cut out each strip and sticky tape the ends so you don't loose any of the inside.
6. Glue each of the strips onto the enlarged one where they'd go on. Use the retraced version which you retraced inside the enlarged one as a guide. It should look like the green sunglasses in the picture, just with uncut bits where the strips had already been cut out.
7. Cut out the uncut bits mentioned in step 6.
8. Get one of the Skewers and measure the width of the bridge of your nose. That measurement, like picture mine was 2.5cm, I'd then measure 2.5cm on the skewer 3 times, marking each 2.5cm with my Lead Pencil. I'd colour each 2.5cm the same colour, which should be the main colour of your drawing, and then cut out each 2.5cm individually. Then, sticky tape all 3 pieces together, and use that to join your two drawings together with more sticky tape.
9. Colour-in two more skewers the main colour of your drawing, or leave the skewer the same colour. Cut out two 2cm bit's of Skewer, coloured in or not, and sticky tape one to the end of one long skewer, and then sticky tape the short bit to one drawing. Do that for the other side and the other two skewers.
10. Wear it!!! You've finished, you've completed your Sun-Glasses! I hope they look like the ones in the picture! I also hope my instructions were understandable...
:D
-Just Grace
Sunday, 13 January 2013
Word of the Week: Hemidemisemiquaver
 This 'Word of the Week' is probably one of the funniest words. Infact, it sound like the type of word Roald Dahl would use to describe something. The weirdest thing is, it's a Real word!!!
Hemidemisemiquaver: Noun: Pronounciation: hemi-demi-semi-quaver.
Meaning: A Sixty-Fourth Note
Wow, I didn't even know there was a Sixty-fourth note! Hahaha, funny. This is definitely something I'll be telling my Music Teacher! :)
If you have any idea's for a 'Word of the Week,' then please comment it bellow.
-Just Grace
Review: GoAnimate
 Hi, Readers!
I'm going to be doing another review on the free Website: GoAnimate. Ok, lets start!
GoAnimate is a free animation-making website. All you need to do is type in your email, which won't be shown on the site; they only need it to send you stuff, your display name, (which doesn't have to be your real name) and then your password of course! After that, click 'Create Acount', click on the type of video you want to make and start the tutorial. Soon you'll be making top-rated video's!
What I really like about GoAnimate is the easy controls, sound-effects, voice-adding and make-your-own-character features. I don't really know what else to say other then it's a great, easy to use website. What I also like about it is that there's a School Mode so you can ask your teacher to do it at School. There's also a Business Mode.
If you want more with GoAnimate, then you could get GoPlus+ which has far better features, but I have to say that GoAnimate just on it's own is just as good. So, what are you waiting for, click on new-tab and get started!
If you want to view my video's, my display name is: ilovedaisy
-Just Grace
Subscribe to:
Posts (Atom)